Sunday 12 April 2015

Gothic Upper-case alphabet

In this post, I have put together a simple project about how to write upper case Gothic style letters using a calligraphy pen.  There are many variations of Gothic styles, and here is an example, shown in the YouTube clip.

As you can see, the letterforms have extra details added to enhance the appearance of the letters.  I used a broad nibbled calligraphy pen, black ink and I drew some guidelines to keep the letters even.  The letters were about 6 nib widths high.


5 Steps to Write Impressive Fancy Letters

Gothic Black Letters or Majuscule style letters are quite tall, normally they are taller than the ascenders.  In this example, I have drawn diamond shapes using a broad nibbed pen within the letters, which are created by drawing short strokes using a broad nibbed calligraphy pen.  They help to decorate the letters and make them appear grand.  I have also drawn vertical thinner lines, decorations, flairs and flicks drawn within the letters.  I held the pen nib at a constant 45 degree angle.

1)    First, map your work out by drawing faint straight lines on some paper using a ruler and a hard nibbed sharp pencil
2)    Draw the outline of your capital letters with a faint pencil for guidelines
3)    Holding your broad nibbed calligraphy pen at a constant 45 degree angle, carefully draw the letters as illustrated in the clip and draw the ticks at the vertical edges of the letterforms
4)    Holding your calligraphy pen nib vertically, draw the vertical thin lines as illustrated
5)    Draw the diamond shapes carefully by keeping your calligraphy pen nib at a 45 degree angle and draw very short lines so they appear like diamond shapes.  Draw them by the thin vertical lines within the letters


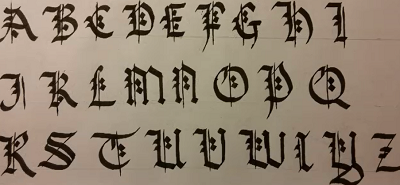
Gothic Upper-case Alphabet
Majuscule Letters in Gothic Calligraphy

Some letters are quite wide, such as the letters S, Z, H, A, and D.  Other letterforms are based on the shape of the letter O.  They are quite wide and fit within a square.  These letters are O, Q, C, G, and T.  Narrow letter are B, F, J, N, U, V, L and Y.

Simple Hints to Writing Gothic Letters

  • Use a broad nibbed calligraphy pen
  • Keep the nib angle at a constant and steady 45 degree angle
  • Draw guidelines with a fine pencil before writing the Gothic letters
  • Keep practicing until you are happy with your calligraphy writing

Sunday 29 March 2015

How to Draw Celtic Knots project 2

For this project, I have drawn a simple Celticknot design, using some inexpensive art materials, some paper and a gold edging marker pen.

The Celtic Knot Shape

Celtic knots resemble interwoven ribbon designs, that go around forever and they can easily be incorporated into any calligraphy project or on a gift card.  Celtic knots are commonly used in tattoo designs and printed on fabric.

My Celtic Knot Project 2


I started this project by drawing a Celtic knot by freehand, using a hard nibbed 2H pencil and layout paper.  The materials I used were a black pen, some pencils for shading and a gold pen.

I first drew the outline of the Celtic knot in fine pencil, then I drew the outline with the black pen and then shaded the Celtic knot using a 2H and 2B pencil.  The 2B pencil was used for the darker shading.  You can use any medium for this project, such as charcoal or coloring pencils.  You can get watercolor pencils from any art shop, and they are great for setting off some color to your artwork.  You can dip the pencil in some water and apply the pencil to paper and this will give an appearance of watercolor paints. 

When mapping out the Celtic knot shape, be mindful that you keep the ‘ribbon’ width consistent throughout.


A Simple Celtic Knot Design

Celtic Knots and Calligraphy

Celtic knots are used for ornamentation, monuments and manuscripts and were used extensively in the 8th century Gospels and the Book of Kells.  There are an endless variety of Celtic knot designs and they can look like basket weave knots or ribbons.  Celtic knots can be used in all sorts of calligraphy projects and are a great way to introduce designs in any calligraphy work.

Celtic knots look complex and appealing but they are easy to draw and look great in any project, with introductions to color and shading to really set off your work.  They are like plaits on paper and have an interlaced looking structure.  They appear to have ropes crossing over each other, over and under, like ribbons, for ever.

I will be posting other Celtic knot designs so they can be introduced and used for other calligraphy projects.  Celtic knots are relaxing and fun to draw.
I love Celtic knots because they are quite simple to draw, but the look beautiful and sets off any artwork really well.  

Saturday 28 March 2015

My Easter Calligraphy Projects

For this project, I have created a couple of Easter time creations. The first one is a simple Easter card that I written in calligraphy using red ink a fine calligraphy pen and a small nib. I used a basic calligraphy style. I also drew a cross using a fine black biro. I first traced out an outline before drawing the cross. 


Easter, also known as Resurrection Sunday, is one of the most important religious date in the Christian calendar.  Jesus was crucified on Good Friday and his body was taken from the cross and placed in a tomb and on the third day, he rose again.  The week leading up to Easter is called Holy Week.  Maundy Thursday is the Thursday before Easter Day and Palm Sunday is the Sunday before Easter day.  Easter holidays are enjoyed by many and is a good time to have a go at some Easter art.


A Simple Easter Project for Easter Cards

For this Easter project, I have created a couple of Easter creations.  The first one is a simple Easter card that I written in calligraphy using red ink, a fine calligraphy pen and a small nib.  I used a basic calligraphy style.  I also drew a cross using a fine black biro.  I first traced out an outline before drawing the cross.  To do this, I used some plain paper, a hard nibbed pencil, such as a 2H, and a black pen.   For the ‘Easter time’ lettering, I used a broader nibbed calligraphy nib and ink.  For the cross, I simply mapped out a picture of the cross and drew it with black ink.

Many people celebrate Easter by giving chocolate Easter eggs or other gifts, but many would rather give out an Easter card during this time.  Easter is also associated with Easter chickens, or the Easter Bunny.  The Easter Chicken are associated with Easter because this came from Pagan days, when they were a sign of New Life.  Later on, the Christians took this meaning as a symbol of remembering the Resurrection of Jesus and a New Life.  Decorated eggs came from an older culture, where eggs were colored red to signify the blood of Christ at his crucifixion.  This tradition was adopted by Christianity.   The painted eggs are now replaced by chocolate eggs.

Other Easter Designs

There are many ideas that you can use for Easter, such as painting a picture of an Easter egg, an Easter Bunny, some daffodils or a religious theme.  Yellow is associated with Easter, and this color is related with the spring and longer days.

Designs for Easter Holidays
Other Colors of Easter for your Designs


There are other colors you can use for your designs in Easter time, such as Red, which represents the blood of Christ, Gold, which is associated with celebration and richness, and white, which represents purity.

Thursday 26 March 2015

Pilot Parallel Pens

For this project, I used a Pilot Parallel Pen, 2.4mm nib size and green cartridges.  There are an assortment of cartridges in the pack and it makes for great color choices.  You can create a gradient of colors by touching one nib with another one of a different color and this will create a gradual change of color as you write, which make some beautiful effects.

Calligraphy Is Fun

Parallel Pen Nib Sizes

The Pilot Parallel pen comes in four nib sizes, which are 0.5mm, 2.4mm, 3.8mm and the broadest being 6.0mm. The colors available are black, blue, green, red, yellow and purple. The great thing about these pens is that you can create very fine lines by holding the pen sideways so the nib is vertical.

The Pilot Parallel pens nibs are sharper than conventional fountain pens.  The nibs consists of two parallel plates, which help to hold the ink and they also have sharp corners so the writing appears cleaner, sharper and crisp, and the writing more impressive.  The parallel plate is a unique design, and you can achieve sharper, smoother and neater calligraphy handwriting, better than conventional calligraphy pens.  The ink flow is excellent and you can pick the pen up again after months of not being used, and the ink will flow easily as if it were only used yesterday.  There is a converter in the pack, which is used to clean and flush the pen out after use or for ink refill.  The pack has a shim, which is used to clean the nib between the plates.


Paper For Pilot Parallel Pens

The paper I used was A4 sized sketch paper, which was of a high quality 130gsm white cartridge paper.   However, I found that the paper could not cope with the amount of ink used on the paper.  The ink started to soak in the ink and started to bleed and became feathery.  This was rather disappointing but I do like the colors.  For this project, I also used a fine nibbed conventional fountain pen and deep red ink.

I was excited with the new pens, but it is important to be mindful of the quality of paper used.  If feel that hot pressed paper of a higher quality is better for these pens because of the amount of ink that comes out of the nibs.  These pens can use a lot of ink, so it may be a cheaper alternative to keep the ink cartridges and refill them with good quality ink, but be careful when choosing ink as some may clog the pen.

Saturday 21 March 2015

Writing a Menu

Step by Step Writing a Menu


Step by Step Writing a Menu

Mapping out a menu is a great way to practice calligraphy and laying out your work.  It is a simple project that is productive and also fun to do.  You can use this technique for writing menus on chalkboard.

For this project, I wrote a menu by mapping out the menu layout first, using a faint pencil and a ruler.

1.               I mapped out my work using a hard nibbed pencil and a ruler.  I drew straight lines and marked out the centre of the paper by dividing the paper width measurement into two and drew a line in the centre of the paper.  I used a set square to ensure the measurements are straight and at a right angle.
2.               I mapped out the letterings by first of all by counting each letter and letter-spacing of each line.  I then divided the total number of letters / letter-spacings into two and worked out the letter or letter-spacing that is central.
3.               I write this central letter or letter-spacing on the central vertical line drawn on the paper, and then I carefully map out the other letters before and after this central letter to ensure the sentences are central to the paper.  I write the letters from the centre, outwards.   
4.               I mapped out all the letters carefully, using a faint pencil as guidelines before writing the letters with a calligraphy pen.
5.               In the example shown, I used black and red ink and a fine nibbed calligraphy pen
6.               I introduced some swirls, using a broader nibbed calligraphy pen
7.               I always remember to check the spelling!

Other Hints and Tips

Don’t forget to check your calligraphy pen nib size so the letterings are not too big or small, and fits comfortably onto the page.

Writing menus are a fun way of practising how to layout your work and practice centring the letterings.

How to Practise Writing Menus

You can make up your own menu design and practice writing the layout of your menu on some stiff card or fancy paper.  You can also introduce some swirls, patterns or even some Celtic knots to customise your menu.  You can draw some frames or margins to exemplify your work.  It is special to make your own home-made custom menus and you can give it that individual and unique touch.

Putting Color into Menus


Why not introduce some pastel shading, watercolors or color to your design with pencils, or even draw some illustrations of food to enhance your menu.


Thursday 19 March 2015

Writing A List In Calligraphy

Finding every opportunity to practising to write in a calligraphy style is a great way to keep your skill alive and refining your technique.  You can find lots of opportunities to do this, for example, when writing out notes, writing a shopping list, a menu, a task list, even doing a crossword puzzle or Arrow Words!  Anything that needs handwriting can be written in a calligraphy style.  You will find that your calligraphy will look better with time and it will become second nature and you may also find that you can write calligraphy faster than before.
In the example shown below, is an example of how you can use calligraphy in everyday situations, such as a simple shopping list. 


The YouTube clip shown illustrates how to write a short shopping list written in Gothic style, using black ink and a broad nibbed calligraphy pen.  Of course, if you are in a rush, then it is not practical to do this.  I used a Manuscript calligraphy pen and the nib size used was a 4B or 2.8, which is one of the broader sized nib.  You can write out a list of anything you like, such as a grocery list, things to do or other lists in general.


A collage of calligraphy writing
Keep Practising Calligraphy for a Professional Look

Writing gift cards, Christmas cards, birthday cards, festive events and any other special occasional cards, are a great way to practice gorgeous handwriting.  Writing a letter for a special occasion, and writing on an envelope with beautiful styles is a lovely and creative personal touch for that someone special.  Writing calligraphy is very relaxing if you know how and writing a list is a great start in practising calligraphy styles but it is important to enjoy it too.

Monday 2 March 2015

Mother's Day Cards

Mother’s Day or Mothering Sunday has been celebrated for many years around the world, and the tradition originated from North America.  It is a celebration of motherhood and family bonds.  In the UK, Mother’s Day moves ever year, usually around the spring time.  Families traditionally invite families around for Mother’s Day and treat their mothers with gifts, days out, chocolates and cards.  In the US, Mothering Sunday is a national holiday and is a celebration of the importance of mothers.

In the UK, this day is celebrated on the fourth Sunday in Lent and the dates are not fixed.  Celebrating Mother’s Day came earlier than in the USA and England was the first country to celebrate Mother’s Day.  Mother’s Day cake is traditionally a Simnel Cake, which is an almond cake.

How to Write a Mother’s Day Card Using a Calligraphy Pen

Here is an example of how to write a Mother’s day card using a broad nibbed calligraphy pen, black ink and writing in Gothic style.  I used black ink cartridges and a Manuscript calligraphy pen.  The broad nib size used was a 4B or 2.8.  When writing on card, be careful to choose a card that is not too shiny or rough, as this will affect your calligraphy work.  Shiny card will make the ink smudge and run and rough surfaces will make your nib snag and will affect your calligraphy work.  Before writing your card, think of a short and simple poem or think about what you’d like to write in the card.  Draw some faint pencil lines with a ruler for guidelines before you write in your card.

YouTube Clip of How to Write in Calligraphy


This video clip gives an example of how to write out a Mother’s Day card using a Gothic style, but you can choose another style, such as Italic or Cursive.  You can draw patterns or swirls to set your work off nicely and introduce some colors to create some stunning designs.  You can also use fancy calligraphy writing for gift tags too.

Practice your writing on a scrap bit of paper before writing in the Mother’s Day card, and make sure your work is evenly spaced and pleasing to the eye.
You can use calligraphy writing for other gift cards too, such as Birthday cards, Valentines cards or Christmas cards too.  Calligraphy can be used in so many ways, is versatile and is fun to do.